Wednesday, September 28, 2011

Artist Spotlight + Giveaway: Sarah Burns of AnOptimisticCynic

It all started with a heart.
Tonight's Artist Spotlight features the mastermind behind one of my favorite Etsy shops: AnOptimisticCynic, where you can find all manner of crocheted organs (and cells to be specific). You can even find crocheted sperm, one of which will be given away to a lucky reader at the end of this post! Her name is Sarah Louisa Burns, and here is her interview.


Please introduce yourself, what lead you to begin creating?
My name is Sarah, and I have been making things since I've had the manual dexterity to do so. My mom taught me how to knit and sew along with reading and writing, and my grandmother taught me how to crochet. I knitted for years, but I was never very good at it, and discovered that I was just more proficient with a hook.
Where the magic happens.

Who in your life has been the biggest inspiration to your work?
My family and friends inspire everything I do. I like to work in different mediums, from yarn and hook, to acting in front of a camera, and I've been extremely lucky to have an amazing network of friends and family who support all my crazy ideas, and provide me with insights on where I need improvement, or could expand.  

What is your favorite medium to work with/favorite technique to use?
Acting is my favorite mode of creation. Developing and inhabiting a character is exciting, and provides unique challenges that force me to look at my own life differently. Crochet is a close second, as is drawing, specifically pen and ink, and sewing, which I do all too infrequently, although I did make about a quarter of my wardrobe.

Small Crocheted Heart
What do you hope to accomplish through your work?
The first body part I made was a heart. It sold almost immediately, and I started getting requests for more organs, different body parts, and the repertoire grew and grew. I slowly began to realize the visceral reaction these little crocheted plushes have on people. I hope to touch people in some way. Make them curious about what's inside them; make them laugh at the absurdity that is a crocheted gallbladder; make them think of that loved one who survived a heart attack, or had their appendix out.

Which item currently listed in your shop is your favorite and why?
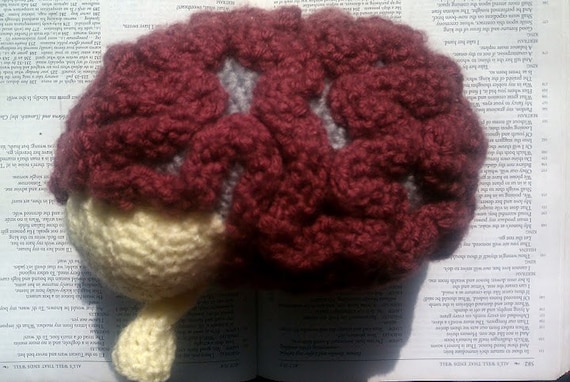
Crocheted Brain Pillow
It's a tight tie between the Life Size Brain Pillow Plush, and the Skull, both of which are two of newest and more complicated designs. They take a long time to make, but they just look so cool! It's such a funny thing to just have a full sized brain sitting out on your coffee table. They're real conversation starters.  

What fellow artist(s) have you been impressed by recently?
I've been a big fan of The Anti-Craft, and Monster Crochet for along time now. Also aKNITomy is Amazing. I like to roam the streets of NYC and yarn bomb to destash - for which I have to credit Magda Sayeg for 'inventing', Mandy Moore and Leanne Prain of Vancouver for popularizing, and Agata Oleksiak for officially bringing it to NYC.  

Crocheted Teratoma, perfect for Halloween
What is the best piece of advice you’ve been given as an artist?
Have confidence in what you do. Some days it will seem like every single person you come across will have something to say about your work. If its good advice it can be inspirational, if it's bad, or more often than not uninformed, take their words with an enthusiastic smile, and a "Thank you yes, I'll consider that." You know what you're doing, have faith in your work.  

What are you plans for the future of your shop/work?
I plan to continue exploring various aspects of the human body through crochet. I also plan to expand my jewelry line (mostly crocheted and beaded pieces), and I have art prints that I plan to make available in the shop very shortly.
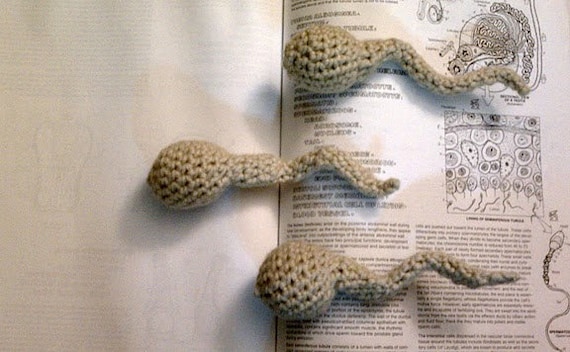
***
Crocheted Sperm

Many thanks to Sarah for taking the time to tell us about her work, and for offering up one of these totally awesome (and hilarious) crocheted sperm to one of my readers. Read more to see how to enter the giveaway.

Monday, September 26, 2011

Goobye Summer, Hello Halloween!

It's official, summer is over. Last week we had a few days of sunny warm, albeit very muggy, weather, but now the rains have come. Not that this is a bad thing, I actually rather like the fall. Just something in the air I guess, maybe I just feel less guilty sitting inside blogging all day when it's rainy out. I also cook a lot more in the cold months, the heat from the over and stove are a lot more welcome when it isn't 70+ degrees. Autumn is just full of wonderful flavors. Hot apple cider, pumpkin pie, spice cakes, and my guiltiest pleasure: salted caramel mochas from Starbucks.
The colors of fall are a welcome change from the bright hues of summer, much more calm and warm. This treasury that our Autumn Leaves apron is featured in shows exactly what I mean.

And of course I can't help but love this season, because it hosts one of my favorite holidays: Halloween! I can count the number of years I haven't dressed up for Halloween in my life on one hand. Each costume has been unique and many were homemade including, but not limited to, Columbia from Rocky Horror Picture Show, Sally from The Nightmare Before Christmas, Lara Croft, and my personal favorite: a squirrel suit complete with hood, tail, and paw mittens.
The squirrel costume, however, was simple in comparison to the project we took on two years ago. Cami, a mutual friend, and myself decided to make, from scratch no less, the most accurate representation possible of Flora, Fauna, and Merryweather. We sewed dresses, petticoats, capes, and even made hats from scratch, the only part of our costumes not handmade were the fairy wings.

Grey Taffeta Damask Apron
This is our first year celebrating Halloween in our shop and we already have a few aprons up for the season, my favorite so far is this gorgeous piece made of grey taffeta with a cut velvet damask pattern, it's dark for Halloween but the print can still be worn year round.

You can see all of our Halloween and fall aprons in the Seasonal Section of our Etsy shop. We have at least five other apron designs in the works, including an adorable 50's style applique apron than I'm half tempted to keep, so keep an eye out for more in the coming weeks. Another of our Halloween aprons, the Black and Maroon Spiderweb style, was featured in this awesome collection of Halloween items.

As you can tell I'm very excited for the coming holidays. What are you most excited for this fall? Do you have a costume planned yet?

Saturday, September 24, 2011

Mandy's Bytes: Jäger-Schnitzel

As you might have noticed from the Bitchin' Cookies recipe, I don't always follow recipes very closely. And sometimes I don't even really use one. Today's post doesn't have a recipe per se, it's more like a set of guild-lines and you can make it work for you however you need to. Schnitzel is traditionally made with veal cutlets (wiener schnitzel) but this recipe uses pork, technically making it schweine schnitzel. Specifically this is Jäger-Schnitzel, which strictly speaking isn't supposed to be breaded, but it's yummy that way.
Jäger-Schnitzel:
- Pork chops
- Eggs
- Milk
- Bread crumbs
- Mushroms
- Onion
- Butter
- Gravy Packet
- Sour cream

I didn't include measurements, because it really depends on how much you want to make, and your personal preference on onion and mushroom proportions. The amounts I mention in this post make enough for two to four servings. First you can chop one medium sized onion into large slices and slice the mushrooms however thick you like. I bought 1 pound of pre-sliced mushrooms this time and they were a little thicker than I like, but no harm done. Set these aside.
Next is the fun part, tenderizing the pork chops. Since Schnitzel uses very thin pieces of meat you need to really beat up on them, so if you've had a stressful week this is a great meal idea. They should be about 1/4-1/8 inch think by the time you're done with them.

After you've tenderized the meat, set up your breading stations. One egg and about a tablespoon of milk is more than enough for four chops, and I like to use an edged baking pan for the breadcrumbs to avoid making a huge mess. First dredge the meat in the egg and milk mixture and then coat it with breadcrumbs.

After the pork chops are breaded and ready, set them aside, and get your pans prepared. I like to put about 2 tablespoons of butter in each pan, you can use oil or whatever fat you prefer. Heat both pans to med-high. In one pan place the pork chops, and brown each side. After browning turn the head down to medium.

In the other pan sautee the mushrooms and onions, I usually end up adding another tablespoon or so of butter after they are coated. Cook these until the mushrooms are tender and slightly browned, and the onions are translucent. Now it is time to the make the gravy, you can make your own gravy from the pork drippings if you like, otherwise set the pork chops aside on low heat.

In the mushroom pan turn the heat down to medium-low, push the vegetables to one side of the pan and mix the gravy according to the packet instructions in the cleared space. One packet is enough for four servings. After the powder is well mixed with the water, or broth if you like, stir the mushrooms and onions back in. The final touch is to stir in a dollop of sour cream, I use a pretty generous "dollop", because I love sour cream.

I swear there's a pork chop under there somewhere.
Serve up the pork chops with a few nice big spoonfulls of gravy and enjoy. I served this with a green bean side that is beyond simple. I steamed some fresh green beans for about 7 minutes, sauteed them with butter and garlic, added a splash of balsamic vinegar to simmer for a couple minutes and topped them with feta cheese. Jäger-Schnitzel is also great with fries to mop up any extra gravy, yum.

Thursday, September 22, 2011

Seattle Tilth's New Starts Green Gala and Auction

Today I have exciting news to share about an event we're participating in. We were recently invited to have our aprons featured in the New Starts Green Gala and Auction being held by Seattle Tilth to raises funds to support their Seattle Youth Garden Works program. Four of our aprons, below are the fliers I made up for the auction, are being featured in the silent auction at the event, which is on October 1st at the Mountaineers Club in Seattle.
The benefits of the auction go to their Seattle Youth Garden Works program which empowers homeless and underserved youth by providing employment and education growing, packaging and selling produce at farmers markets. You can purchase tickets to the event here and you can follow Seattle Tilth on Facebook to learn more about this event and the other work that they are doing in the Seattle community.

Special thanks to Jennifer Crouch of Seattle Tilth for contacting us and offering us the chance to be featured in this auction.

Thursday, September 15, 2011

Artist Spotlight: Jessica from Cursive Arts

Now that we've added our Get Featured page, we hope to post more often featuring fellow artists. Today we're featuring Jessica who sells original linocut prints, greeting cards and original illustrations in her Etsy shop: Cursive Arts. Below is our interview with Jessica about her work, inspiration and aspirations.

Jessica's companion, Luca
Please introduce yourself, what lead you to begin creating? My name is Jessica, I'm 29 and live with my husband, our cat and dog in Charlotte, NC. My earliest memories are of my mom drawing posters for us of movies we likes, rather than buying them (mine was "The Little Mermaid") and drawing on pillowcases with melted crayons. I think growing up watching her draw instilled in me that it was just a natural thing to do (and of course was where I got my talent). Art has always had some part in my life, though up until the last few years, it was mostly a hobby I never took as seriously as I should have.

Who in your life has been the biggest inspiration to your work? 
Jessica's Workspace
Definitely my mother. She is the whole reason I began drawing in the first place. Then as we got older, she stopped drawing as much and focused on working and taking care of kids. I've been pressing her for so many years to start drawing again and she finally is. She called the other day to ask me about drafting tables, because she's going to start drawing and painting regularly again. That makes me so happy, because I have always felt she has amazing talent.  


What is your favorite medium to work with/favorite technique to use?
Carving the block.
Obviously I love linocut or block printing, as that is the majority of my shop. However, my true love is pen and ink drawing. I love clean lines and simple shading. It's probably why I love linocut almost as much. It's all black and white, positive and negative.
(Read Jessica's own blog post about how her cards are made here.)

What do you hope to accomplish through your work?
Hullo Block Print Cards - Set of 4
One of the reasons I really like printmaking is because it keeps the art affordable. I love art but rarely buy any, because I can't afford original work. In a way, every linocut is original, because each is slightly different than the last. This is even true with my cards, which are essentially open ended editions you can write in. So, to clarify, I really hope I can provide people with super-affordable art. I also would hope my cards might get a few more people writing letters. There is truly nothing like receiving a good old-fashioned letter.  

Which item currently listed in your shop is your favorite and why?
Dr. Who TARDIS 8 x 10 Print
I have to say, definitely my TARDIS print. I just got into Doctor Who recently and it came out so very well. It's one of the few pieces I would hang on my own wall, as on homage to that awesome show. I would like to state I do use my cards all the time to write letters.  

What fellow artist(s) have you been impressed by recently?Well, the two artists I have hanging in my studio are macro prints from Kim Ulric and some prints from Elly Mackay. Another favorite is Kailey Lang, her illustration style blows me away.  

What is the best piece of advice you’ve been given as an artist? "You should make notecards." I was given the idea by my mother-in-law, who thought I should have prints of my illustrations turned into notecards. However, I could not really afford that process at the time and so researched other methods of printmaking. Long story short,
Cursive Arts planning central.
it's how I discovered linocuts.

What are you plans for the future of your shop/work? I'm going to keep on making linocuts, and hopefully I will be able to get back into the illustration side of things and draw more (and maybe get those llustrations made into cards). I also really hope, in the next year or two, I'll be able to live a decade long dream and take a tattoo apprenticeship. I love the idea of people carrying my art on their body for life. It's the ultimate honor. 

 You can purchase Jessica's cards and artwork in her shop, and you can check out her blog here. You can also see her portfolio on her website.

Wednesday, September 14, 2011

Top 5 Treasury Resources

Tonight's post is all about treasuries. This is a collection of the top five resources I've found in relation to treasuries. From the reasons why you should make them, why you should participate in a treasury team, and what to do when you are featured in a treasury to two different kinds of tools you can use for making and sharing treasuries.

1. Why Make Treasuries?
This blog post about Creating Treasuries and Collections is from Market My Shop. It discusses how the making of treasuries not only supports and promotes the other shops but also brings traffic and attention to your own. He also gives some tips and tricks on making a good treasury.

2. Joining a Treasury Team
I've mentioned this post from Jenna's Red Rhino about Joining Treasury Teams before in my post about joining the Treasury NonTeam. It is a great post describing some of the benefits of joining a treasury making team, and how much fun it can be.

You've been featured!
3. When You Get Featured
Making treasuries is all well and good, but this next blog post from Creative Originals talks about what to do when your item is featured. Read this post to know what to do to promote treasuries featuring your items, after the initial happy dance of course.

4. Tools For Making Treasuries
If you've made treasuries before you probably know that it can be a bit of a pain. Luckily Schmetsy provides a set of tools to help you out. Their treasury maker allows you to save drafts of your treasuries as well as simply click an item to add it. My favorite tool of theirs is the convo sender which notifies all the featured artists with just a few clicks.

5. Tools For Sharing Treasuries
Once you've made your treasuries you'll want to share them. Craft Cult provides just the right tool for this with their Treasury Widget creator. Below is an example of my latest Halloween treasury displayed by Craft Cult. Not only is this tool great for sharing your treasuries, you can also use it to see and share treasuries you're featured it. The featured search is great since you don't always know from your Etsy feed where your work is being featured.

Tuesday, September 13, 2011

The Great Pegboard Project of '11

I know I've been pushing a lot of buildup for this post over the last few weeks, but we've finally got the pegboard up and most of our supplies organized. I'm not quite done organizing it yet, I ended up ordering some little jars and bins for our smaller supplies. But I decided to go ahead and write about it before I mentally block out what a pain in the ass it was to do.

Proof that some fun was had.
Let's start off with our supply list. Note that this is not intended to be a tutorial, more like a cautionary tale (just kidding, it wasn't that bad).
Supplies:
- 5'x3' Pegboard
- 1"x2" boards for frame
- 3" Coarse thread drywall screws
- 3/4" wood screws (which got lost)
- Washers
- Stud finder
- Power Drill
- High Gloss Exterior Latex Paint base color and two accents
- Pegboard accessories (thankfully including more small screws to replace the lost 3/4" screws)

First we had to acquire the pegboard, after much searching of craigslist and discovering that a sheet of pegboard at Home Depot only costs about $12 we decided to spring for the new stuff. Pegboard comes in 4'x8' sheets so you'll have to have it cut down to the size you want.

We got a little bit ahead of ourselves here and decided to go ahead and paint the board first, and it worked out okay since we were able to make the frame while the paint dried. the best kind of paint to use is high gloss exterior latex paint since it makes the pegboard very easy to clean. It's important to put only a small amount on the roller as the paint can pool in the holes and clog them.

Once we knew what size pegboard we wanted we had to calculate the lengths of 1x2s we would need for the frame. The part that makes this the most interesting is that 1x2s are actually not 1" by 2" they are 3/4" x 1 1/2". Don't ask me. You'll need two pieces the length of the board and four pieces that are the height of the board minues three inches. We had two 60" boards and four 33" boards.

Making the frame was not the easiest task, it involved splitting boards, splinters, and even a little cussing. We used the stud finder to measure out where the middle supports needed to be, standard studs are about 16" apart, and so are ours it turns out.We figured having at least three of the vertical frame pieces on studs was good enough so we placed one 16" from the edge and another 32" from the first, so that both the middle supports and one edge were on studs.

Once my oh-so-patient boyfriend finished all the pre-drilling and screwing of the frame, we lined it back up with the studs (which we marked of course, don't forget to mark them) and screwed it to the wall. Two drywall screws in each vertical support was plenty.We used the high tech method of "eye-balling it" to make sure the frame was level, I would recommend using a level, but we don't have one. It turned out just fine anyways.

After the frame was up and the first coat of paint was dry, we got to the fun part. This is the part shown above in the photo
Be sure to use a drop cloth for this part.
proving that I actually smiled at least once during this process: splatter painting! Heaven forbid we have a boring pegboard so we picked up two different colors of premixed paint test jars from Home Depot to do a two colored splatter pattern. These little jars have brushes built right into the lids, so you don't even have to get a good brush messy.

We splattered a sage green color first, and after it dried, a golden yellow color. Be sure to check all the holes for large drips of paint so they don't get clogged. And if you paint it outside like we did, give it a good once over for trapped bugs. Only one mosquito was harmed in the making of this pegboard.

After the paint was all dry it was time to put this baby up on the frame. As I mentioned above, we bought 3/4" wood screws for this purpose, but when it came time to mount the pegboard they were nowhere to be found. I'm sure they'll turn up months from now. Luckily in one of the sets of accessories
Spacers are completely optional.
we bought were some screws with spacers. These are intended to be used when mounting a much lighter pegboard, so you can forgo the frame. Even with the frame they are helpful and provide a little extra space cushion. We also placed washers into the equation since the screws were barely bigger than the holes.

The spacers help by providing extra space behind the board, and allowing you to use the holes on the very edge of the pegboard. However, using screws without them allows you to place anchor screws into the middle vertical frame pieces, which you cannot do with spacers. So it's up to you to decide what will work best for your needs.

We started by screwing down the four corners, and then adding in screws midway down the sides, and two more screws evenly spaced along the top and bottom edges. So if you decide to leave the spacers out, you would also put a couple screws into the middle frame pieces as well. Unlike when putting the frame together, it's not really necessary to pre-drill the holes for these screws.

Now that we had the pegboard secure I started arranging our supplies. I used a bunch of the standard hooks that come in the accessories kit to hang up our measuring tapes, scissors, rotary blade, ruler, embroidery hoops and thread. I used a few larger supports to hang up a dowel holding all of our ribbons. The part I like the most
I'll post an update when it's completely done.
so far is that I was able to mount one of our storage bins which has small removable boxes on the board, putting all of our binding and other notions is arms reach. The big blank space is going to be filled up with little hanging jars of buttons, and bins for little items like sewing machine needles and small tools. I also had a large plastic bin leftover from my kitchen project, so I used that to hold all of our pens, and care tags.

I'm really excited with how it's turned out so far, and I'll post again when I have all the jars and bins up and organized. Our sewing room is finally coming together, and I think that we will be well prepared to take on the holiday season this year.

Friday, September 9, 2011

My Memories Giveaway Winner!


So as you might have noticed, if you entered the My Memories Suite giveaway, I forgot to announce the winner yesterday like I was supposed to. Shame on me, I know. Well, without further adeu our grand prize winner for their very own copy of My Memories Suite digital scrap-booking software is: Melissa Jon!
Congratulations Melissa! I will be emailing your with your winning code to receive a free copy of the software. For the rest of you who entered don't forget that you can use the coupon code: STMMMS91230 for $10 off the My Memories suite program as well as $10 to spend on scrapbooking kits from the My Memories Suite online store.

Keep an eye out in our shop tomorrow for a new apron, and I'll be making the oh so hyped up pegboard post this weekend, too!

Tuesday, September 6, 2011

Inspiration in the Kitchen

You've probably noticed by now that I love to cook, bake, eat, all things kitchen related. Except doing dishes, just ask anyone I've ever lived with. But for the most part, the kitchen is a happy place for me. My latest kitchen project was part decoration,part organization.
Bygel Series from Ikea
First of all, the wall behind the sink was beyond boring, no window, no cabinets, no shelf, just wall. Secondly our only method of "storage" for dish scrubbers and things was cramming them in around the faucet and hoping they didn't end up at the bottom of the sink under a pile of dishes. With a little help from Ikea and I filled the blank wall with a handy rack for all my dish scrubbers, soaps and oven mitts.

This set of measuring cups and spoons is my latest acquisition when it comes to kitchen tools. Before getting these, the only measuring spoons I had were 1 tbsp and 1/4 tsp, and I inexplicably didn't have a 1/4 cup scoop despite having two different sets. The best part about them, besides the gorgeous colors, is that the whole set was only $0.99 at Grocery Outlet.

 Speaking of utensils, I shared my bird vegetable peeler in my last post, so I thought I'd round up the whole gang to show you. They are available from Animal House by Boston Warehouse, their website is not very functional but you can find these online and in most stores where they sell kitchen gadgets.

Shabby Chic Secretary Desk from 6Turner
Can you tell that I like bright colors yet? I also like storage space, which we're a little short on. For now we have a small bookcase acting as a microwave stand on another blank wall (what is it with the unused kitchen walls anyway?), but I absolutely love this cute little hutch. Although I'd prefer shelves to drawers on the bottom, I love the colors and the details on the cabinets doors.

But my all time favorite kitchen item to drool over on Etsy are these amazing sets of magnetic glass spice jars from Cook Outside the Box. Now I'll admit that I probably wouldn't know what to do with all of the spices there, but I like to think that having a set on my fridge would inspire me to become a spice master.
Everything Spice Kit - Set of 24

A girl can always dream right? Speaking of dreams and decoration, I just put the final paint touches on our pegboard for the sewing room, and that baby's going up today! I'm really excited to finally put it to use. I've taken lots of pictures and will be posting a tutorial post of the process soon!

P.S. The giveaway for a free scrapbooking program ends tomorrow so get your entries in soon!
Related Posts Plugin for WordPress, Blogger...