Thursday, March 31, 2011

Mandy's Bytes: Raspberry Cream Cheese Coffee Cake

First of all I have to confess that I didn't actually make this recipe recently, I made it a few months ago. However, due to the fact that my baking plans for today are to make more S'mores Bars, and since I happened to take pictures of this cake when I made it, it seemed like a decent substitute for fresh bakes.
 
Raspberry Cream Cheese Coffee Cake (Recipe from Cooks.com)
- 1 (8 oz.) pkg. cream cheese, softened
- 1 c. sugar
- 1/2 c. butter
- 1 3/4 c. all-purpose flour
- 2 eggs
- 1/4 c. milk
- 1 tsp. baking powder
- 1/2 tsp. baking soda
- 1/2 tsp. vanilla
- 1/4 tsp. salt
- 1/2 c. raspberry preserves (or any type)
- Powdered sugar

As always the first step is to preheat your oven, this cake bakes at 350 degrees. Then, ladies and gentlemen, start your mixers! Beat together the cream cheese, sugar and butter until it's fluffy, preferably fluffy ala Agnes from Despicable Me.
After the mixture is the proper fluffiness, add about half the flour, the eggs, milk, baking powder, baking soda, vanilla and salt and commence the mixing. After about 2 minutes it should all be well blended. Then you can add the rest of the flour, you can tell it you saved the best for last so it won't get it's feelings hurt. Do the rest of the beating on low, to avoid giant flour puffs, until it's entirely mixed.

Get a 13x9 inch pan all greased up. I like to use the cooking spray made with flour for baking, so much easier than the "shake some flour around a buttered pan" method (better known as "making a huge mess"). Once the pan is ready spread the mix evenly throughout.

Now in the original recipe the next step tells you to spoon the preserves on top of the mixture in "dollops" before using a kinfe to create a marbled look. I found it worked a lot better to a piping bag (aka a zip lock sans one corner) to make stripes across the top of the cake and then marbled them with a knife. I substituted boysenberry preserves for the raspberry, and you can use whatever you like best. Whichever suits your fancy, it will still be delicious. I'd like to mention here that next time I make this cake I will be adding stripes of a cream cheese concoction in addition to the preserves, if you wanted to try it I would estimate a 3oz package of cream cheese, 1/3 cup sugar and 1/4 teaspoon vanilla whipped together should do the trick.

After your preserves are marbled to perfection, stick this puppy in the oven for 30 to 35 minutes. You can test it just like any other cake with a toothpick or raw spaghetti noodle to see if it comes out clean, just don't stick it in a spot with preserves. Let it cool for a few minutes and then sift the powdered sugar over the top, cut it up, and enjoy!

Sunday, March 27, 2011

Philosophical Felines

Anyone else out there who runs an Etsy shop knows that it's not always an easy task. Sometimes life doesn't allow the extra time required to keep up with our creative duties. Along with that comes that sneaking sense of artistic guilt. Are we letting our followers down by not posting new aprons this week? How can they go on without another recipe to try? But the ones who really understand the situation best, are our pets, cats specifically.

Anyone who owns a cat knows, that they really have the right view of life. Wake up, eat, play, nap, lounge in the sun, eat, nap, and so forth. They really keep you grounded, and teach you to not get be so hard on yourself. So to make up for the lack of blog posts this last week, and to give due diligence to my own kitty counterparts, this post is to introduce my wonderful kitties.
 First in order of ownership is Lily, she is a sassy no nonsense tuxedo cat. As you can see here one of her favorite hobbies is applying a hefty layer of fresh fur to any newly washed clothes, and anything left out in the open. Her favorite napping spot is this shelf on my bookcase where I keep clean (at least before she gets to them) towels. Lily's other activities include absconding with any hair ties she can find, and chasing Jupiter around the apartment like a bat out of hell. Which brings us to my other awesome kitty, Jupiter.
Jupiter is a total stud muffin, I adopted him from a local shelter called Animal Talk, and when I saw him I instantly fell in love with his no-tail and clipped ear. He likes to pretend that he's a tough kitty but really he's a teddy bear and loves to spoon with Lily. These two are my moral support and my non-pharmaceutical blood pressure medication.

Along with kitty cuddles, one of my other relaxation techniques recently has been making treasuries, including my submission for this weeks Treasury NonTeam Challenge. My treasury this week is titled "Sunrise, Sunset" and features the bold warm colors of the spring sun.

Saturday, March 26, 2011

Somebody Loves Us

Actually a few people! Even though we've had a busy life outside of working on aprons for the shop this week, we've still managed to gather some attention from a few different angles.

First to mention is Elsa Pakopoulou whose blog runs an ongoing feature called the People Project to showcase Etsy artists. Elsa was kind enough to highlight our shop over on her blog, you can read our post here.

We were also featured in a smattering of Treasuries this week, and we'll start off with a feature from our friend Jenna from Jenna's Red Rhino.


We've also been included in two entries to this weeks Treasury NonTeam Challenge. The first is from Anne who runs the shop Cozy Noggin where she sells some adorable knitted accessories. She featured us in this cute Cottage Chic treasury:


We were also included by Patricia from Bubble City Soap where you can find a wide assortment of cute molded soaps, including my personal favorite, the crocodile soap. Her take on the challenge is this collection of crimson for Mother's Day:

Thursday, March 17, 2011

Happy St. Patrick's Day!

In the spirit, and colors, of the holiday our Apron Verde was featured in a St. Patrick's Day treasury made up of members from the Retro Handmade Team.


This apron is hot hot hot this week as it was also featured in this cute treasury, fresh off the farm.

Wednesday, March 16, 2011

Mandy's Bytes: The Luck 'o' the Irish Soda Bread

So feeling in the St. Patty's Day spirit this week I wanted to pay homage to my Irish heritage, and also to the fact that I was out of yeast..., but mostly the Irish thing. So I decided to make some Irish Soda Bread (now you see where the yeast part comes in, haha), and I found this simple recipe online:
  • 4 cups flour
  • 1 tbsp sugar
  • 1/2 tbsp baking powder
  • 1/2 tbsp baking soda
  • 1½ cups water
  • 2 tsp vinegar (cider or white)
This recipe was incredibly easy, just a straight forward, mix all the dry stuff, add all the wet stuff kind of recipe. First you want to preheat the oven to 400 degrees, then we'll get to all the mixing. Of course I wasn't going to pass up the chance to use my Kitchenaid  mixer, and accompanying dough hook, so I measured out the flour, sugar, baking powder, and baking soda into the mixer bowl.
Next we'll add in the water and vinegar to the mixer bowl.
Now you just go ahead and put the mixer on a low setting and mix the dough until it comes away from the sides of the bowl. Then just make sure that all the extra dry mix gets picked up from the bottom of the bowl.
Be sure to flour your hands before touching the dough, because it will be extremely sticky. I man-handled the dough into a well floured loaf pan, the original recipe calls for making a round loaf if you prefer.
When it came out of the oven after about 35 minutes it had a nice golden brown crust, which I immediately slathered with butter and garlic, resulting in a very delicious looking final product.
After digging in my only suggestion to those making this recipe would be to add at least a teaspoon of salt in with the dry ingredients because it was a little bland. Otherwise is was quite tasty, and a fabulous way to celebrate the holiday.

Tuesday, March 15, 2011

Pacific Northwest Pride

Drapes of Wrath was featured in not one, but TWO separate treasuries showcasing Pacific NW artists today!

The first is by Erin Davis from Portland, OR who sells vintage items, up-cycled art, and DIY oragami kits over at her shop Bona Fide Chic.


The other treasury is a collection by Holly who sells the cutest after-baking decorative cup cake papers, they can seriously dress up your cup cakes! You can see them in her shop Delectable Delights.


A big thanks to both our Pacific Northwest friends for supporting other local artists!

Sunday, March 13, 2011

Who are you calling a pansy?

One of our aprons, the Positively Purple Pansy Apron, had been featured in a lovely treasury which is an ode to that fabulous flower by Brenda Smet. Brenda creates beautifully hand beaded necklaces which you can view in her etsy shop, Brenda Smet Jewelry.

Friday, March 11, 2011

Why we joined the NonTeam...

When I decided to start our blog, I spent a lot of time browsing the blogs of other Etsians, to see what everyone had to say. In my search I found a post by one of our fellow members of the EtsyRAIN Team for artists in the Seattle area, Jenna of Jenna's Red Rhino, where she sells awesome lingerie and other accessories. In her post she discussed the valuable experience she had with joining a treasury team. While we have done treasuries before it was usually either at a whim, or to promote another team such at EtsyRAIN or the Retro Handmade Team we are part of. The idea of joining a team for the sole purpose of making treasuries had never occurred to me.

So I went about looking for a team that fit our interests and time availability and finally decided upon the Treasury Challenge NonTeam. This "team" which actually isn't, was perfect for us. Every week there is a new inspiration item, upon which you build your treasury, if the seller of the featured item chooses you as the winner the next weeks item will be from your shop and you become the judge. However, as opposed to many other teams, there is no requirement to participate. You simple follow their blog and watch for the weekly item, and then you choose whether to participate or not. That way if you don't have time, you won't be shunned for not filling your treasury quota that week.

This weeks inspiration item was a very cute felted great horned owl kit, you can find it at the weekly challenge post here. And here is our treasury to be judged for this weeks challenge, what do you think?

Thursday, March 10, 2011

Fabulous Fruit Find

You don't really realize how spoiled you get growing up in a farming community where any number of your neighbors grow fruit of some kind, you can pick it yourself, and there's always something ripe. Not until you're grown up and move into a city and suddenly the nectarines are hard as rocks, the strawberries are huge but flavorless, and the raspberries are NEVER sweet.

So when I found a fruit stand on my way home from work today, you can probably guess how happy I was. And of course I wanted to share that happiness here because, well, I'm sure you all can appreciate the joy that comes from nice fresh locally grown produce, too.
This had to have been one of the tastiest fruit salads I've had in months! The strawberries were crisp and sweet, the grapes plump and juicy, and the kiwis were soft because they were actually ripe (rather than from being "test squeezed" by god knows how many grocery shoppers).

And just because I love them, I also indulged in a pair of delectable artichokes.
It didn't matter that I had shopped for the fruit in the pouring rain, or that by the time I paid for everything I couldn't feel my fingers anymore. The feast that resulted from my spur of the moment shopping was totally worth it, I mean who needs fingers anyways? Good fruit is waaay more important.

Wednesday, March 9, 2011

Avocado is Back!!

The lovely Miss Lisa who makes some seriously kick ass jewelry over at Divine Bijoux featured our That 70's Apron in this fun treasury which pays homage to the colors of the 70's. Check out her shop and show this awesome treasury some love!

Tuesday, March 8, 2011

Bazaar at Maple Valley Community Center May 1st


Drapes of Wrath will be making their first public selling appearance this spring at a bazaar we were invited to held at the Maple Valley Community Center in Maple Valley, WA on May 1st. The event will be open to the public from 10am until 6pm.

Please come out and support us for this event! We will have our shop inventory available there for purchase and perhaps some new items you haven't yet seen in the shop online. You can take a look at what we have to sell now at our Etsy site. There will also be many other vendors at the event for you to shop around.

In addition to how excited we are about selling to people in person, we are also excited to announce that in conjunction with the event we will be donating 5% of the proceeds we make from our sales there to a local family to help in their daughter's fight against brain cancer. There will be a table set up for donation at the bazaar and you can find out more about the family at http://www.sadiesfight.com/.

We'd love to see you there so please stop by and say hello!

Saturday, March 5, 2011

Mandy's Bytes: S'more Bars

I recently made the discovery that Betty Crocker has a Flickr photostream devoted entirely to recipes. It was here, in the desserts sections, that I disovered these:
www.bettycrocker.com

Entitled "Warm Toasted Marshmallow S'more Bars" (original recipe can be found here) I knew I had to make these, I mean, just look at them!


The instructions sounded too simple to be true and they don't even require that many ingredients:
  • 1 pouch (1 lb 1.5 oz) Betty Crocker® sugar cookie mix
  • 1 cup graham cracker crumbs
  • 1 cup butter or margarine, melted
  • 3 cups milk chocolate chips (18 oz)
  • 4 1/2 cups miniature marshmallows
I didn't realize until I started lining up for this picture that I only had the "Small Batch" size cookie dough mix, so I ended up reducing the recipe by about a third and using a 9x9 pan instead of 9x13.

First things first, you want to preheat your oven for 375 degrees. Now for those of you who may not be as kitchen inclined as myself, let me make the case to you for making your own graham cracker crumbs. I bought plain old graham crackers and made my crumbs myself, not only because I can't justify paying an extra dollar for the same amount of crackers just because they are pre-crumbled, but because it's fun. I'm not kidding. Not only is it fun, but if you've had a long day, week, whatever, it will make you feel sooo much better to take your blunt object of choice and have at those crackers. Trust me.

Once you have the 1 cup of crumbs, whether you made them yourself or not, you are going to mix them with the 1lb 1.5 oz Betty Crocker Sugar Cookie mix and a large mixing bowl.
 Stir them together until they are evenly mixed, and then pour 1 cup of melted butter all over this mixture. The dough is easily stirred with a mixing spoon, just make sure to get all the crumbly bits off the sides of the bowl. Then scoop it out into an ungreased 9x13 inch pan. When you first put it in the pan it will look like a hot buttery mess, probably because it is.
I spread the mixture over the bottom of the pan with my spoon first but it didn't cover very well so I evened it out by using plastic wrap to cover the dough and flattening it with my hands.
After your dough is all flattened out, pop it in the oven for 18 to 20 minutes or until set, when the dough is done it should be golden brown and not wiggle when you shake the pan.
Now you have to do some quick work, when you take the pan out of the oven you want to sprinkle 1 cup of chocolate chips evenly over the dough. Let them hang out for a few minutes and get nice and melty (yeah I know that's not really a word). While you're waiting, kick the oven up to broil. Once the chips are melted you can spread them around with a spatula to cover any bare patches of dough.
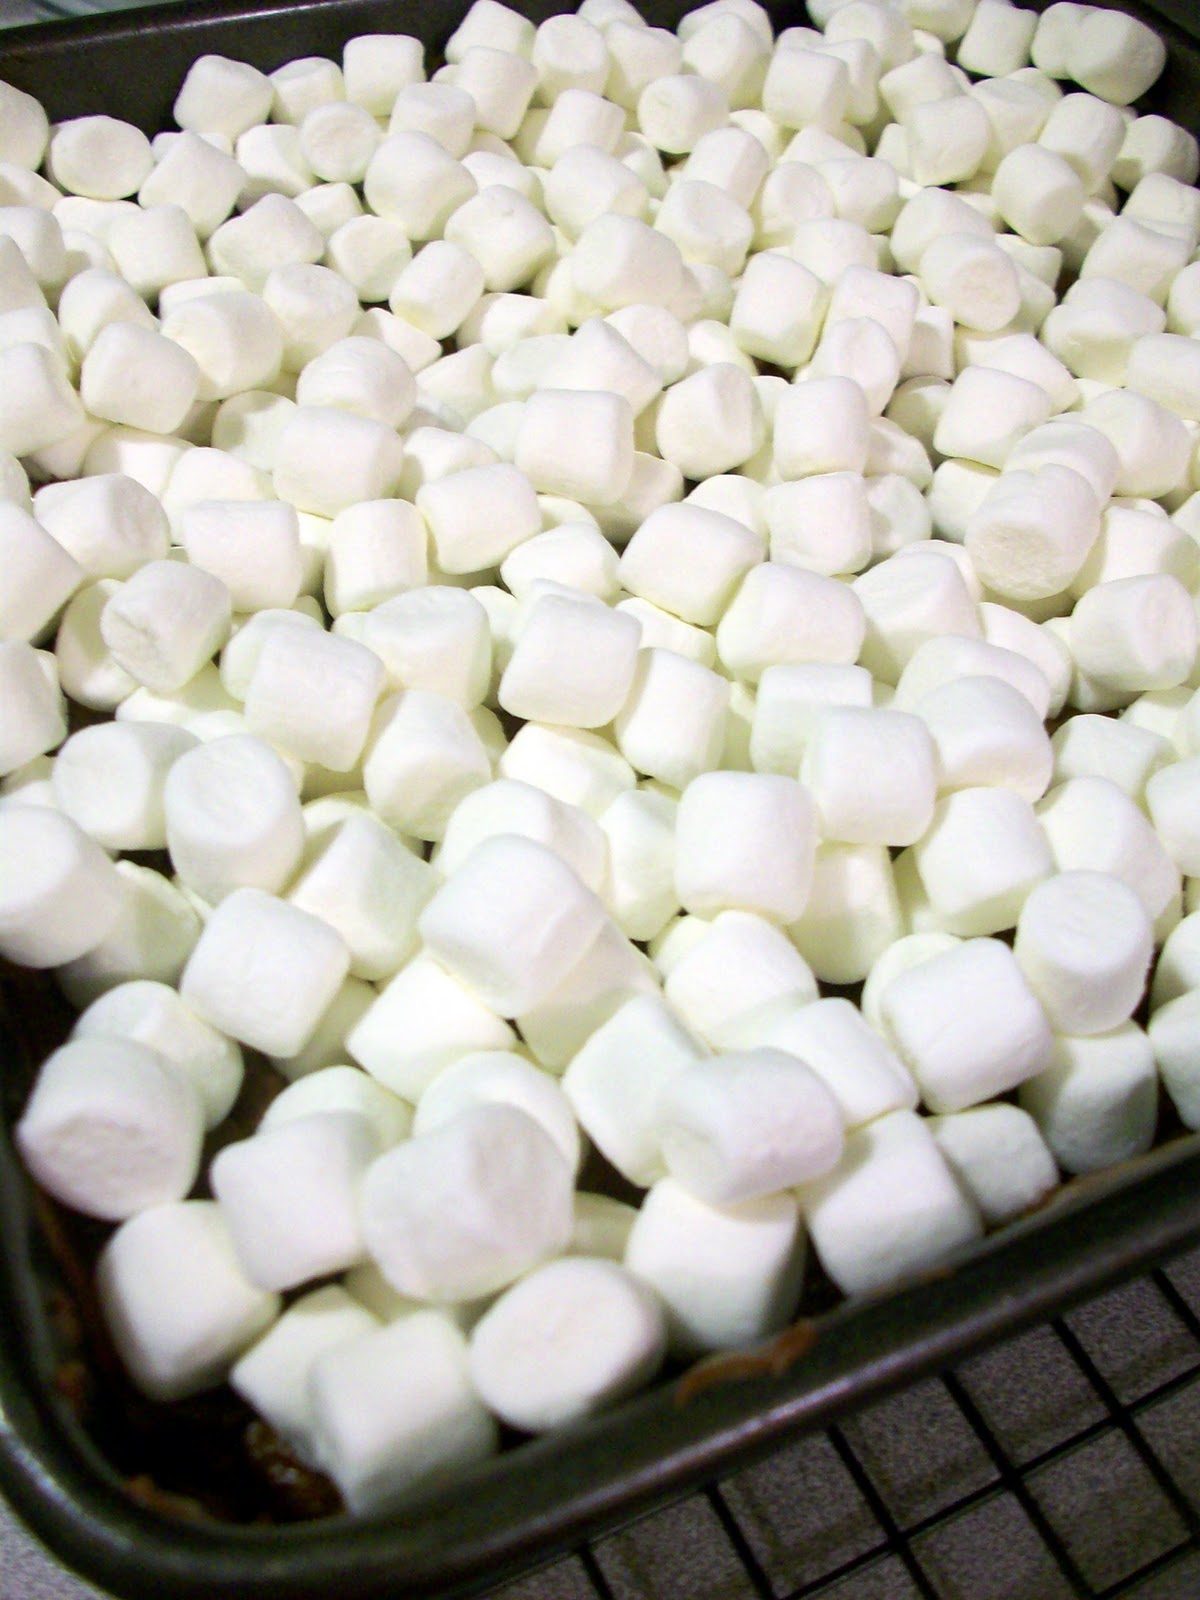
Now you can take those 4 1/2 cups of fluffy mini-marshmallow goodness and sprinkle them over the top of the chocolate, spreading them around until they are even dispersed.
This next part is a little scary, but don't worry, if I can make these with out lighting anything on fire, then so can you! You're oven should be set on broil, and you want to stick the pan back in the oven with the tops of the marshmallows about 4 or 5 inches from the top oven coil.

 The most important part of this step is not to go ANYWHERE!

Don't try to do a few dishes. Or have a snack. Or think about anything but the MALLOWS! Seriously. You have to stand at your oven and watch these babies like a hawk or they will burn. It only takes a few second for the marshmallows to brown and then you have to take them out immediately. Have your fan on high if you have a touchy smoke detector because I'd be willing to bet these would set it off in a heartbeat. Mine came out a little dark, but that's how I like my s'mores, with a little char.

So there you have the final product, let them cool for a good 10 minutes before you try to cut them.

Have a big glass of milk ready because every bite is a gooey, chewy mouthful of pure AWESOME.
Looks like this recipe has earned it's place in my recipe box. Cami got this recipe box for me for Christmas from a fellow Etsy artist Debby Arem who makes all sorts of awesome stuff out of old computer parts.
S'more Bars, I welcome you to Mandy's Bytes.

Related Posts Plugin for WordPress, Blogger...