Wednesday, September 14, 2011

Top 5 Treasury Resources

Tonight's post is all about treasuries. This is a collection of the top five resources I've found in relation to treasuries. From the reasons why you should make them, why you should participate in a treasury team, and what to do when you are featured in a treasury to two different kinds of tools you can use for making and sharing treasuries.

1. Why Make Treasuries?
This blog post about Creating Treasuries and Collections is from Market My Shop. It discusses how the making of treasuries not only supports and promotes the other shops but also brings traffic and attention to your own. He also gives some tips and tricks on making a good treasury.

2. Joining a Treasury Team
I've mentioned this post from Jenna's Red Rhino about Joining Treasury Teams before in my post about joining the Treasury NonTeam. It is a great post describing some of the benefits of joining a treasury making team, and how much fun it can be.

You've been featured!
3. When You Get Featured
Making treasuries is all well and good, but this next blog post from Creative Originals talks about what to do when your item is featured. Read this post to know what to do to promote treasuries featuring your items, after the initial happy dance of course.

4. Tools For Making Treasuries
If you've made treasuries before you probably know that it can be a bit of a pain. Luckily Schmetsy provides a set of tools to help you out. Their treasury maker allows you to save drafts of your treasuries as well as simply click an item to add it. My favorite tool of theirs is the convo sender which notifies all the featured artists with just a few clicks.

5. Tools For Sharing Treasuries
Once you've made your treasuries you'll want to share them. Craft Cult provides just the right tool for this with their Treasury Widget creator. Below is an example of my latest Halloween treasury displayed by Craft Cult. Not only is this tool great for sharing your treasuries, you can also use it to see and share treasuries you're featured it. The featured search is great since you don't always know from your Etsy feed where your work is being featured.

Tuesday, September 13, 2011

The Great Pegboard Project of '11

I know I've been pushing a lot of buildup for this post over the last few weeks, but we've finally got the pegboard up and most of our supplies organized. I'm not quite done organizing it yet, I ended up ordering some little jars and bins for our smaller supplies. But I decided to go ahead and write about it before I mentally block out what a pain in the ass it was to do.

Proof that some fun was had.
Let's start off with our supply list. Note that this is not intended to be a tutorial, more like a cautionary tale (just kidding, it wasn't that bad).
Supplies:
- 5'x3' Pegboard
- 1"x2" boards for frame
- 3" Coarse thread drywall screws
- 3/4" wood screws (which got lost)
- Washers
- Stud finder
- Power Drill
- High Gloss Exterior Latex Paint base color and two accents
- Pegboard accessories (thankfully including more small screws to replace the lost 3/4" screws)

First we had to acquire the pegboard, after much searching of craigslist and discovering that a sheet of pegboard at Home Depot only costs about $12 we decided to spring for the new stuff. Pegboard comes in 4'x8' sheets so you'll have to have it cut down to the size you want.

We got a little bit ahead of ourselves here and decided to go ahead and paint the board first, and it worked out okay since we were able to make the frame while the paint dried. the best kind of paint to use is high gloss exterior latex paint since it makes the pegboard very easy to clean. It's important to put only a small amount on the roller as the paint can pool in the holes and clog them.

Once we knew what size pegboard we wanted we had to calculate the lengths of 1x2s we would need for the frame. The part that makes this the most interesting is that 1x2s are actually not 1" by 2" they are 3/4" x 1 1/2". Don't ask me. You'll need two pieces the length of the board and four pieces that are the height of the board minues three inches. We had two 60" boards and four 33" boards.

Making the frame was not the easiest task, it involved splitting boards, splinters, and even a little cussing. We used the stud finder to measure out where the middle supports needed to be, standard studs are about 16" apart, and so are ours it turns out.We figured having at least three of the vertical frame pieces on studs was good enough so we placed one 16" from the edge and another 32" from the first, so that both the middle supports and one edge were on studs.

Once my oh-so-patient boyfriend finished all the pre-drilling and screwing of the frame, we lined it back up with the studs (which we marked of course, don't forget to mark them) and screwed it to the wall. Two drywall screws in each vertical support was plenty.We used the high tech method of "eye-balling it" to make sure the frame was level, I would recommend using a level, but we don't have one. It turned out just fine anyways.

After the frame was up and the first coat of paint was dry, we got to the fun part. This is the part shown above in the photo
Be sure to use a drop cloth for this part.
proving that I actually smiled at least once during this process: splatter painting! Heaven forbid we have a boring pegboard so we picked up two different colors of premixed paint test jars from Home Depot to do a two colored splatter pattern. These little jars have brushes built right into the lids, so you don't even have to get a good brush messy.

We splattered a sage green color first, and after it dried, a golden yellow color. Be sure to check all the holes for large drips of paint so they don't get clogged. And if you paint it outside like we did, give it a good once over for trapped bugs. Only one mosquito was harmed in the making of this pegboard.

After the paint was all dry it was time to put this baby up on the frame. As I mentioned above, we bought 3/4" wood screws for this purpose, but when it came time to mount the pegboard they were nowhere to be found. I'm sure they'll turn up months from now. Luckily in one of the sets of accessories
Spacers are completely optional.
we bought were some screws with spacers. These are intended to be used when mounting a much lighter pegboard, so you can forgo the frame. Even with the frame they are helpful and provide a little extra space cushion. We also placed washers into the equation since the screws were barely bigger than the holes.

The spacers help by providing extra space behind the board, and allowing you to use the holes on the very edge of the pegboard. However, using screws without them allows you to place anchor screws into the middle vertical frame pieces, which you cannot do with spacers. So it's up to you to decide what will work best for your needs.

We started by screwing down the four corners, and then adding in screws midway down the sides, and two more screws evenly spaced along the top and bottom edges. So if you decide to leave the spacers out, you would also put a couple screws into the middle frame pieces as well. Unlike when putting the frame together, it's not really necessary to pre-drill the holes for these screws.

Now that we had the pegboard secure I started arranging our supplies. I used a bunch of the standard hooks that come in the accessories kit to hang up our measuring tapes, scissors, rotary blade, ruler, embroidery hoops and thread. I used a few larger supports to hang up a dowel holding all of our ribbons. The part I like the most
I'll post an update when it's completely done.
so far is that I was able to mount one of our storage bins which has small removable boxes on the board, putting all of our binding and other notions is arms reach. The big blank space is going to be filled up with little hanging jars of buttons, and bins for little items like sewing machine needles and small tools. I also had a large plastic bin leftover from my kitchen project, so I used that to hold all of our pens, and care tags.

I'm really excited with how it's turned out so far, and I'll post again when I have all the jars and bins up and organized. Our sewing room is finally coming together, and I think that we will be well prepared to take on the holiday season this year.

Friday, September 9, 2011

My Memories Giveaway Winner!


So as you might have noticed, if you entered the My Memories Suite giveaway, I forgot to announce the winner yesterday like I was supposed to. Shame on me, I know. Well, without further adeu our grand prize winner for their very own copy of My Memories Suite digital scrap-booking software is: Melissa Jon!
Congratulations Melissa! I will be emailing your with your winning code to receive a free copy of the software. For the rest of you who entered don't forget that you can use the coupon code: STMMMS91230 for $10 off the My Memories suite program as well as $10 to spend on scrapbooking kits from the My Memories Suite online store.

Keep an eye out in our shop tomorrow for a new apron, and I'll be making the oh so hyped up pegboard post this weekend, too!

Tuesday, September 6, 2011

Inspiration in the Kitchen

You've probably noticed by now that I love to cook, bake, eat, all things kitchen related. Except doing dishes, just ask anyone I've ever lived with. But for the most part, the kitchen is a happy place for me. My latest kitchen project was part decoration,part organization.
Bygel Series from Ikea
First of all, the wall behind the sink was beyond boring, no window, no cabinets, no shelf, just wall. Secondly our only method of "storage" for dish scrubbers and things was cramming them in around the faucet and hoping they didn't end up at the bottom of the sink under a pile of dishes. With a little help from Ikea and I filled the blank wall with a handy rack for all my dish scrubbers, soaps and oven mitts.

This set of measuring cups and spoons is my latest acquisition when it comes to kitchen tools. Before getting these, the only measuring spoons I had were 1 tbsp and 1/4 tsp, and I inexplicably didn't have a 1/4 cup scoop despite having two different sets. The best part about them, besides the gorgeous colors, is that the whole set was only $0.99 at Grocery Outlet.

 Speaking of utensils, I shared my bird vegetable peeler in my last post, so I thought I'd round up the whole gang to show you. They are available from Animal House by Boston Warehouse, their website is not very functional but you can find these online and in most stores where they sell kitchen gadgets.

Shabby Chic Secretary Desk from 6Turner
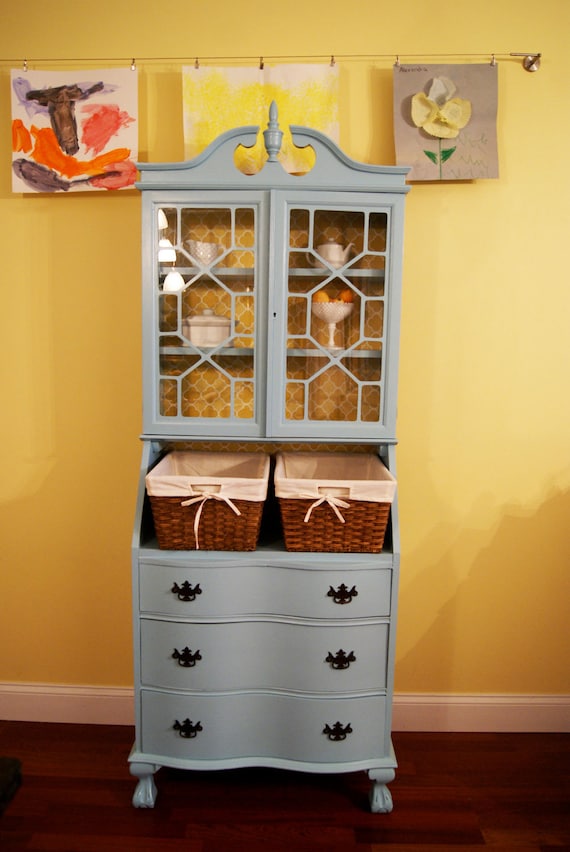
Can you tell that I like bright colors yet? I also like storage space, which we're a little short on. For now we have a small bookcase acting as a microwave stand on another blank wall (what is it with the unused kitchen walls anyway?), but I absolutely love this cute little hutch. Although I'd prefer shelves to drawers on the bottom, I love the colors and the details on the cabinets doors.

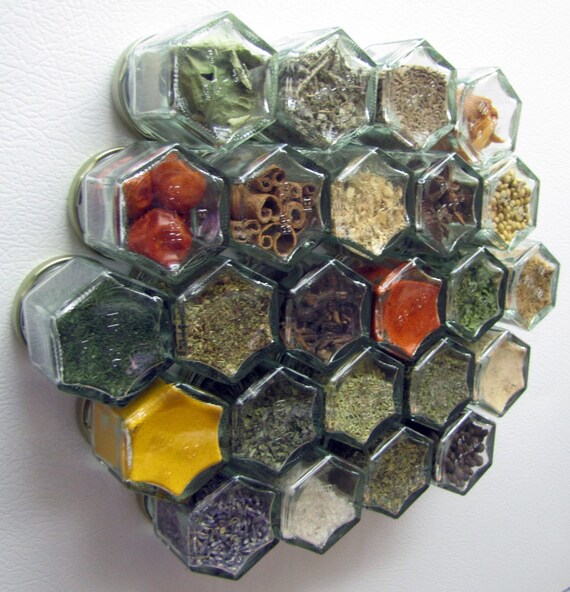
But my all time favorite kitchen item to drool over on Etsy are these amazing sets of magnetic glass spice jars from Cook Outside the Box. Now I'll admit that I probably wouldn't know what to do with all of the spices there, but I like to think that having a set on my fridge would inspire me to become a spice master.
Everything Spice Kit - Set of 24

A girl can always dream right? Speaking of dreams and decoration, I just put the final paint touches on our pegboard for the sewing room, and that baby's going up today! I'm really excited to finally put it to use. I've taken lots of pictures and will be posting a tutorial post of the process soon!

P.S. The giveaway for a free scrapbooking program ends tomorrow so get your entries in soon!

Saturday, September 3, 2011

Mandy's Bytes: German Cucumber Salad

One of the perks of my current "day job" as a home health nurse is that I have been sent home a few times now with fresh eggs and home grown cucumbers. I'll be honest, the first time they gave me cucumbers I didn't really know what to do with them. The first two things I think of when I hear cucumber are pickles, and putting slices over your eyes during a fancy spa treatment. I'm not big on spas and I don't have canning equipment so those were out.

My boyfriend's mother is German, and I hear tell makes fabulous German food, including his suggestion for the free produce: cucumber salad. When he explained a little better the basic gist of the dish, it sounded pretty damned good, so I was sold.

The first batch I made was decent, except for the fact that one cucumber out of two was extremely bitter, but you can't look a free cucumber horse in the mouth. It may not have been perfect, but it was tasty none the less. So today when I received three more cucumbers, I was pretty excited to get home and jump right into Round Two. After which I now present to you my perfected (IMHO) recipe.

German Cucumber Salad:
- 3 cucumbers
- 1 cup sour cream
- 4 tbsp vinegar
- 2 tbsp water
- 2 tbsp chives
- 1/2 tsp salt
- 1/4 tsp pepper
- 1/4 tsp dill
- 1/2 tsp minced onion


My first warning about this recipe is that it makes quite a lot, my second warning is that you really should make a lot, or it will be gone very fast.

That said, the first step is to prepare the cucumbers, wash them first, and then peel them. You don't need to be precise with the peeling, you mostly just want to get the prickly bits off. And while I'm sure you don't need a photo demostration of peeling cucumbers, I wanted to show off that I have, quite possibly, the best vegetable peeler ever. It's shaped like a bird and matches my squid whisk, hedgehog vegetable brush, octopus dish scrubber, and piranha pizza cutter.

The next step is to thinly slice the cucumber. You can do this by hand, very carefully (see ingredients: no fingers), or
with a mandolin slicer. I happen to be lucky enough to have "inherited" the Chef's Envy mandolin slicer from my mom, who got it at the As Seen On TV store and decided in retrospect that it was too dangerous considering her track record with knives. And to be fair, it is probably the most dangerous item in my kitchen in that even a reasonably careful person could maim themselves with it.

In addition to not maiming yourself, I have a couple other pointers when it comes to slicing the cucumbers. First of all, taste test each cucumber before
you combine them. If you get a very bitter cucumber there's no harm done if you leave it out (except less salad), but no amount of extra sour cream or seasoning will save your salad once those bitter slices are mixed in with the rest. The other piece of advice I learned is to separate all the slices, unsticking them may seem tedious but it's a much more difficult task when they're slathered in dressing, trust me.

Don't let a recipe hold you back!
At this point, the hard part is over with, the easiest way to go about the rest is to start by making a sort of well in the cucumber slices by pushing them to the sides of the bowl. This will make it a lot less messy when it comes time to mix it all up. Into this well add all of the other ingredients; sour cream, vinegar, water, chives, salt, pepper, onion, and dill. You can adjust the seasoning measurements to your own tastes, and feel free to add spices or leave out the ones you don't like.

For the mixing step, I had the best luck with a firm spatula, it has the strength to get the slices moving without damaging them. It's a little tricky to get the cucumber slices to cooperate as well as convincing the sour cream to be friends with the vinegar and water, which like to just puddle at the bottom of the bowl. Which brings me to the sign that the salad is done: when you push the slices aside with a spatula there should be no puddle at the bottom. 

Om nom nom!
Now just serve it up as a side dish, or by itself as a refreshing snack on a hot summer afternoon. I can't officially vouch for how long it will keep in the refrigerator, all I can say is that it never lasts long enough to go bad at my house.

No joke: I'm eating a plate of it right now as I write this post. It's amazing.

P.S. Don't forget to enter our giveaway for some free digital scrap-booking software, the giveaway ends Wednesday!


Related Posts Plugin for WordPress, Blogger...